D2+
14
Days
Ranked
Solo/Duo
GLOBAL
Average D2+ Win Rate: 49.91%
D2+ Champions Analysed: 4,121,952
?
D2+ Champions Analysed: 4,121,952
?
League of Legends + ANALYTICS
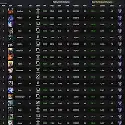


15.15 Patch Notes Champions Performance
D2+ • Patch 15.15 - 4,121,952 Champions • Patch 15.14 - 4,969,396 Champions
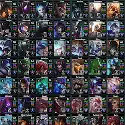
Buffed Champions

Nerfed Champions


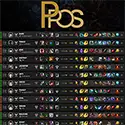
パンテオン(17,453)
Win Rate: 48.06% (-2.11%)
Pick: 4.96 (-4.69) Ban: 14.06 (-6.57)


LoL Champion Builds
エイトロックス Build • アーリ Build • アカリ Build • アクシャン Build • アリスター Build • アンベッサ Build • アムム Build • アニビア Build • アニー Build • アフェリオス Build • アッシュ Build • オレリオン・ソル Build • オーロラ Build • アジール Build • バード Build • ベル=ヴェス Build • ブリッツクランク Build • ブランド Build • ブラウム Build • ブライアー Build • ケイトリン Build • カミール Build • カシオペア Build • チョ=ガス Build • コーキ Build • ダリウス Build • ダイアナ Build • ドレイヴン Build • ドクター・ムンド Build • エコー Build • エリス Build • イブリン Build • エズリアル Build • フィドルスティックス Build • フィオラ Build • フィズ Build • ガリオ Build • ガングプランク Build • ガレン Build • ナー Build • グラガス Build • グレイブス Build • グウェン Build • ヘカリム Build • ハイマーディンガー Build • フェイ Build • イラオイ Build • イレリア Build • アイバーン Build • ジャンナ Build • ジャーヴァンⅣ Build • ジャックス Build • ジェイス Build • ジン Build • ジンクス Build • カイ=サ Build • カリスタ Build • カルマ Build • カーサス Build • カサディン Build • カタリナ Build • ケイル Build • ケイン Build • ケネン Build • カ=ジックス Build • キンドレッド Build • クレッド Build • コグ=マウ Build • カ・サンテ Build • ルブラン Build • リー・シン Build • レオナ Build • リリア Build • リサンドラ Build • ルシアン Build • ルル Build • ラックス Build • マルファイト Build • マルザハール Build • マオカイ Build • マスター・イー Build • メル Build • ミリオ Build • ミス・フォーチュン Build • モルデカイザー Build • モルガナ Build • ナフィーリ Build • ナミ Build • ナサス Build • ノーチラス Build • ニーコ Build • ニダリー Build • ニーラ Build • ノクターン Build • ヌヌ&ウィルンプ Build • オラフ Build • オリアナ Build • オーン Build • パンテオン Build • ポッピー Build • パイク Build • キヤナ Build • クイン Build • ラカン Build • ラムス Build • レク=サイ Build • レル Build • レナータ・グラスク Build • レネクトン Build • レンガー Build • リヴェン Build • ランブル Build • ライズ Build • サミーラ Build • セジュアニ Build • セナ Build • セラフィーン Build • セト Build • シャコ Build • シェン Build • シヴァーナ Build • シンジド Build • サイオン Build • シヴィア Build • スカーナー Build • スモルダー Build • ソナ Build • ソラカ Build • スウェイン Build • サイラス Build • シンドラ Build • タム・ケンチ Build • タリヤ Build • タロン Build • タリック Build • ティーモ Build • スレッシュ Build • トリスターナ Build • トランドル Build • トリンダメア Build • ツイステッド・フェイト Build • トゥイッチ Build • ウディア Build • アーゴット Build • ヴァルス Build • ヴェイン Build • ベイガー Build • ヴェル=コズ Build • ヴェックス Build • ヴァイ Build • ヴィエゴ Build • ビクター Build • ブラッドミア Build • ボリベア Build • ワーウィック Build • ウーコン Build • ザヤ Build • ゼラス Build • シン・ジャオ Build • ヤスオ Build • ヨネ Build • ヨリック Build • ユナラ Build • ユーミ Build • ザック Build • ゼド Build • ゼリ Build • ジグス Build • ジリアン Build • ゾーイ Build • ザイラ Build